• Dein Produkt auf beyond.lol
  • Kontakt
  • Kontakt
  • IP
  • Impressum
  • Datenschutz
  • Software
    • Open Source
  • Hardware
  • Tutorials
    • Web
    • Linux
    • Windows
    • Gaming
    • PHP
    • Raspberry Pi
  • Crypto-Welt
    • Altcoins
    • Bitcoin
    • Ethereum
    • Mining
  • Scripts
    • BASH
    • PowerShell
  • Lustiges aus der IT
    • Spamantworten
  • Gaming
  • and More
    • Dein Produkt auf beyond.lol
    • Kontakt
    • Impressum
    • Datenschutz
    • Tools
      • Wie ist meine IP?
No Result
View All Result
No Result
View All Result
Home Tutorials Linux

netdata Installation und Konfiguration Ubuntu 20.04 LTS | Real-time performance monitoring, done right!

Patrick by Patrick
August 19, 2020
in Linux, Open Source, Tutorials
21
0
netdata Installation und Konfiguration Ubuntu 20.04 LTS | Real-time performance monitoring, done right!
2
SHARES
219
VIEWS
Auf Facebook teilenAuf Twitter teilenAuf Whatsapp teilen

Netdata ist eine open source Lösung für ein Real-time Monitoring mit einer sehr übersichtlichen Weboberfläche. Netdata zeigt dir CPU, RAM, DISK, Netzwerk sowie auf Postfix und viele andere nützliche Dinge an.

Installation

In Ubuntu 20.04 LTS kann Netdata einfach aus dem Standard Repository installier werden.

sudo apt install netdata

Sobald Netdata installiert ist, können wir mit der kurzen Konfiguration vorfahren.

Konfiguration

Die Konfiguration von netdata befindet sich unter: /etc/netdata/netdata.conf. Wir müssen hier grundsätzlich nur die IP Adresse unter „bind socket to IP“ anpassen.

sudo nano /etc/netdata/netdata.conf

oder

sudo vi /etc/netdata/netdata.conf
[global]
        run as user = netdata
        web files owner = root
        web files group = root
        # Netdata is not designed to be exposed to potentially hostile
        # networks.See https://github.com/firehol/netdata/issues/164
        bind socket to IP = 192.168.0.12

192.168.0.12 durch eure IP ersetzen.

Anschliessend Netdata neustarten.

sudo systemctl restart netdata

Webinterface

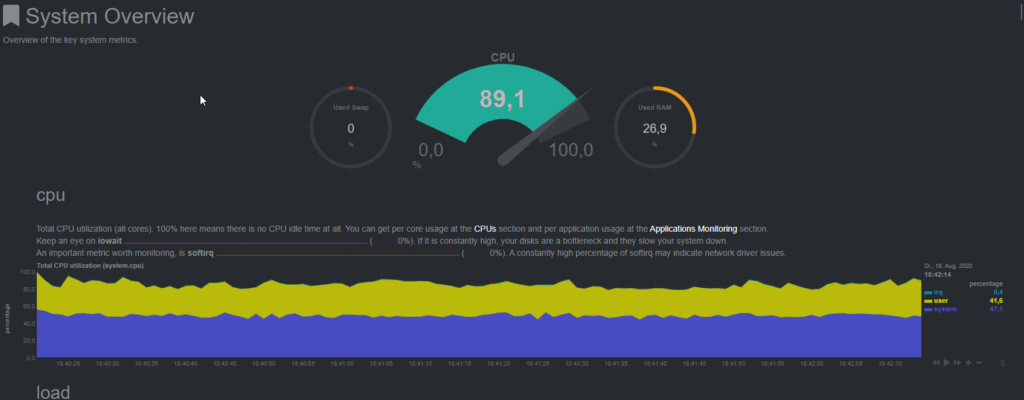
Mit der URL http://IP:19999 kommt ihr auf das Webinterface von Netdata.

Die verschiedenen Graphen und Informationen sollten selbsterklärend sein.

Tags: monitoringnetdatarealreal timetime
Previous Post

Glances Installation und Vorstellung Ubuntu 20.04 LTS | Real Time Monitoring Tool für Linux

Next Post

PFX-Datei mit openssl erstellen

Patrick

Patrick

IT Systemadministrator

Next Post
PFX-Datei mit openssl erstellen

PFX-Datei mit openssl erstellen

Schreibe einen Kommentar Antwort abbrechen

Deine E-Mail-Adresse wird nicht veröffentlicht. Erforderliche Felder sind mit * markiert

Bloggerei.de - Bewertung für beyond.lol
  • Dein Produkt auf beyond.lol
  • Kontakt
  • Kontakt
  • IP
  • Impressum
  • Datenschutz

© 2025 JNews - Premium WordPress news & magazine theme by Jegtheme.

Welcome Back!

Login to your account below

Forgotten Password?

Retrieve your password

Please enter your username or email address to reset your password.

Log In

Add New Playlist

No Result
View All Result
  • Software
    • Open Source
  • Hardware
  • Tutorials
    • Web
    • Linux
    • Windows
    • Gaming
    • PHP
    • Raspberry Pi
  • Crypto-Welt
    • Altcoins
    • Bitcoin
    • Ethereum
    • Mining
  • Scripts
    • BASH
    • PowerShell
  • Lustiges aus der IT
    • Spamantworten
  • Gaming
  • and More
    • Dein Produkt auf beyond.lol
    • Kontakt
    • Impressum
    • Datenschutz
    • Tools
      • Wie ist meine IP?

© 2025 JNews - Premium WordPress news & magazine theme by Jegtheme.